Cabrera, Juan
Cedillo Zuna, Carlos
Giron, Yulisa itsmeli.edublogs.org
Gonzalez, Larisa k-popgirl2000.edublogs.org
Guaicha, Mark chewingmonkey.edublogs.org
Hall, Kyra kyrasblog13.edublogs.org
Harris, Christina christinadur.edublogs.org
Holliman, Netonia nholliman2013.edublogs.org
Hongach Jr, Ernest
Lucas, Jasmyn nlucas.edublogs.org
Mitchell, Nycole nickeycutiepie.edublogs.org
Nauratan, Melizi itsmeli.edublogs.org
Pauta, Jason jpauta.edublogs.org
Santos, Kristina ksantos.edublogs.org
Serrano, Marco mserrano321.edublogs.org
Torres, Dylan lafrincro2000.edublogs.org
Barreto, Junior junior1240.edublogs.org
Bishop, Miracle mbishop6.edublogs.org
Friday, November 8, 2013
Tuesday, November 5, 2013
Paint.Net: Breakout Image
Paint.Net: Breakout Image

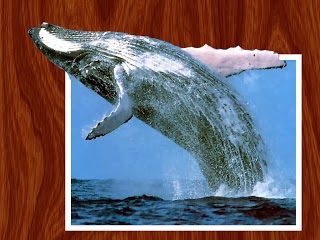
Breakout images are used throughout
advertising to demonstrate action. If you've seen pictures of a baseball
player jumping out of a picture, an animal flying out of a picture, etc.,
you've seen a "breakout image". Sometimes the breakouts are out
of all sides (see image on right) and sometimes they are just leaving one or
two sides of an image (like the example below).
In this example I used a marble texture as a background and warped the corner of the picture to give it a bit of an upturned look.
In this example I used a marble texture as a background and warped the corner of the picture to give it a bit of an upturned look.


Step By Step Instructions:

Step 1: Find a picture that will work well with a breakout.

Step 2: Select the area of the background you want to
preserve, then SELECT > INVERSE and erase everything except the breakout
subject of the picture.

Step 3: Add a background such as wood or marble or dirt.
Step 4: Add a new layer (behind your subject) and draw a rectangular marquee which you will fill with white to give the impression of a photo border. Then select the subject layer (in this case, the whale) and go to LAYER > MERGE DOWN (or CTRL+E).

Monday, November 4, 2013
Period 3 Day 2
Brittani Belin bbelin2000.edublogs.org
Angelina Cardoso angelina18.edublogs.org
Jeremy Carrera kingjj125.edublogs.org
Henry Castro henry42001.edublogs.org
Damek Fountain damekfountain13.edublogs.org
Bryan Illescas Bryan2108.edublogs.org
Stanley Landivar slandivar.edublogs.org
Marcelo Loja
Jeydy Monroy-Jordan jjordan2005.edublogs.org
Camilla Orellana
Tamia Reed
Jessica Sari jessicaz0.edublogs.org
Arvonnay Sparrow-Powell arvonnay.edublogs.org
Garrett Wade colorfulturttles.edublogs.org
Thursday, October 31, 2013
Paint.Net - Project Frankenstein
Okay, this is one of the more bizarre Paint.Net projects I
give. :) I call it "Project Frankenstein".
In this project you will gather pieces of faces from different people, and then composite them into a single image. You can choose male or female, young or old. You will take one persons head... anothers eyes... anothers mouth... and anothers nose. Just so you know, it's almost impossible to do this project without making something "creepy." It's amazing how you can take [what you consider] the most beautiful eyes, the most beautiful mouth, the most beautiful nose, etc. and put them together... and it's hideous.
In this project you will gather pieces of faces from different people, and then composite them into a single image. You can choose male or female, young or old. You will take one persons head... anothers eyes... anothers mouth... and anothers nose. Just so you know, it's almost impossible to do this project without making something "creepy." It's amazing how you can take [what you consider] the most beautiful eyes, the most beautiful mouth, the most beautiful nose, etc. and put them together... and it's hideous.
You can start with Google Images or use pictures of your family or friends.
Or you can go to s:Share\_Bucci\Paint.Net\Frankenstein


Some tips...
- On Google Images click "Large" for size.
- On Google Images click "Face".
- Start with a large picture of a head as the base to put the pieces.
- Select pictures where the hair isn't covering the face.
- Pick faces with approximately the same skin color.
- Pick faces with similar lighting (i.e. from the same side).
- Use your eraser tool to blend the features in.

Note: The question I often get during this project
is: "When will we ever be taking different pieces of peoples faces and
sticking them together?" The answer is, probably never -- but this
project teaches the skills necessary to smoothly merge images, focus on
shadows, adjust color saturation, etc. It's not the project I want you to
perfect, it's your technique.
Subscribe to:
Posts (Atom)